PBX Enterprise Configuration Step-by-Step Guide
Table of Contents
Prerequisites: Step 1 - Assign Microsoft licences Step 2 - Add the Enterprise Step 3 - Direct Routing Step 4 - Add PBX Step 5 - Add Users Calling Features Available once the Connector is Operational Next Steps to Consider:Prerequisites:
- Reseller access to the Microsoft Teams Connector Portal is required.
- Review the checklist for onboarding a new enterprise.
This article is a step-by-step guide to the initial provisioning of the Microsoft Teams Phone Connector. Start with the steps below, and follow links as needed for additional details and troubleshooting. For SMS instructions, see here.
This process will require collaboration between the Service Provider/Reseller and the Microsoft Global Administrator for the Enterprise. Some tasks can be delegated from the global admin to the "Microsoft Teams Service Admin" and "Skype Admin,” but due to Microsoft's security policies, the setup cannot be completed without the Global Administrator's initial involvement.
Step 1 - Assign Microsoft licences
Before beginning wil the Microsoft Teams Phone Connector, each planned Microsoft Teams user must have the correct licenses assigned to them. Somtimes due to high Traffic Microsoft can take up to 24 Hours to activate licenses after they have been assigned, so doing this ahead of time will streamline the rest of the process. Ensure there is one additional set of licenses available and unassigned as a direct routing user. These additional licences can be recovered once the setup has been completed.
If there is a cancelled/suspended trial license and a valid license is added with the same name - the customer should make sure that the cancelled trial subscription is removed from their license listing. If not, Microsoft only returns the cancelled/suspended SKU and the software will erroneously claim that the proper licenses are not available.
Step 2 - Add the Enterprise
As a reseller you will use the Microsoft Teams Connector Portal to add the new Enterprise, ensuruing the email user for registration belongs to the Microsoft Global Administrator tor the new enterprise. This will automatically send and email with a link to start the set-up process.
Add a New Enterprise
- Log in to the Microsoft Teams Connector Provisioning Portal
- Navigate to Enterprises

- Click Add Enterprise

The "Add Enterprise" form will load.

- Complete the following fields.
- Enterprise Name: Name of the client. Enter the enterprise name that will show up in the portal. Note: The Enterprise name should have a minimum length of 5 and a maximum length of 50 characters.
- Enterprise Admin Email ID: Client's global admin email address. Enter the email address of the person who controls the Microsoft Enterprise Global Administrator** for your business customer.
- Services: PBX
- User Limit: Leave blank
- Request Consent For Enterprise Management: Yes. The enterprise admin will receive an Action Item to Grant Consent if this option is checked.
- Country: Select United States
- Billing Reference: If you have an external billing system, enter the string that identifies this enterprise in your billing system. This string will appear in reports.
- Restrict Enterprise Admin Access: Check this if you (the reseller) will perform all enterprise management functions. The Enterprise Global Admin will still have to log into the Enterprise Portal to give consent to the Reseller. The "Request Consent for Enterprise Management" above must be checked.
- Click Submit
- The Global Administrator will immediately receive an invitation email to the Teams Connector Provisioning Portal. Before proceeding, they must set up Direct Routing.
You can monitor the status from the “Edit Enterprise” screen and on the dashboard under Enterprise Admin Action Items.

Note: The Microsoft Office Global Administrator is the highest level of administrative credentials in Office 365 administration. It is required to initially register with the TMC and to install the PBX Application. It can be used for the entire setup process or this can be delegated to another User with Teams Service Admin and Skype for Business Admin rights. Specifically, Users with those delegated rights can set up Direct Routing and Manage Users.
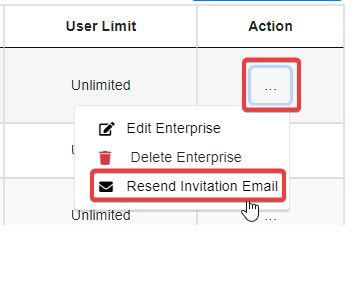
Resend Global Administrator Invitation Email
If the initial invitation email is not received, you can resend it to the Global Administrator.
- Log in to the Teams Connector Provisioning Portal
- Navigate to Reseller > Enterprises and locate the enterprise you'd like to resend the invitation.
- Click the three dots next to the enterprise and select Resend Invitation Email.
Step 3 - Direct Routing
- The Global Administrator of the Microsoft Tenant will receive an email from Microsoft Teams Phone with an invitation Code and a link to complete registration. This process was initiated when you created the Enterprise in the last step.
- Copy the Invitation Code and click on "Complete."
- Log in to the portal with Global Admin Credentials.
- Navigate to Enterprise > Direct Routing

- Ensure you have the correct Microsoft Office licensing. You must have at least one available AND unassigned User license with the Phone System or a comparable add-on that allows you to use Direct Routing. The Direct Routing page displays relevant licenses.
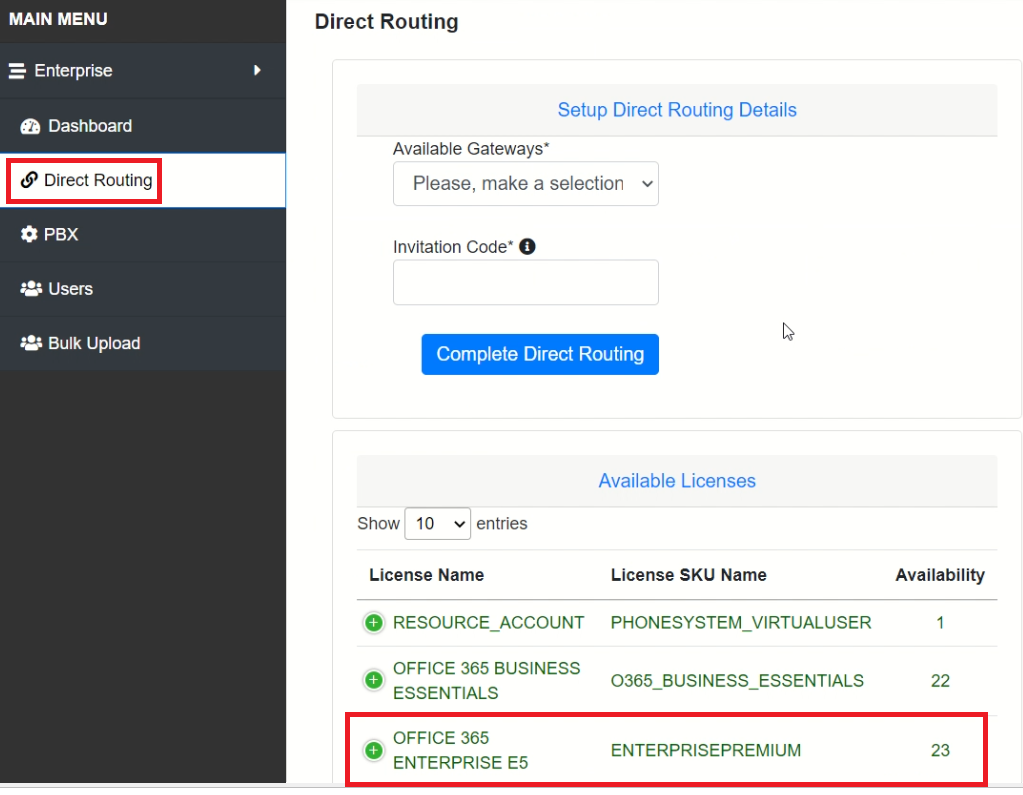
- Under Setup Direct Routing Details, select the desired Gateway.
- Paste the invitation code from the email.
- Then click "Complete Direct Routing.”
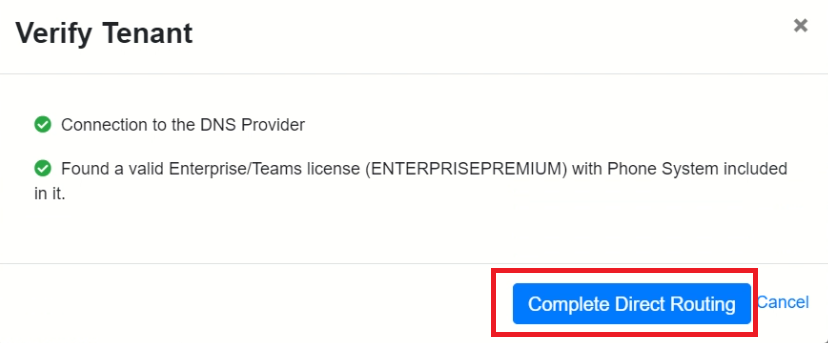
- The "Verify Tenant" will pop up, verifying the connection to the DNS Provider and validating licenses.
- Click "Complete Direct Routing" as soon as the verification is done.
Direct Routing Completion
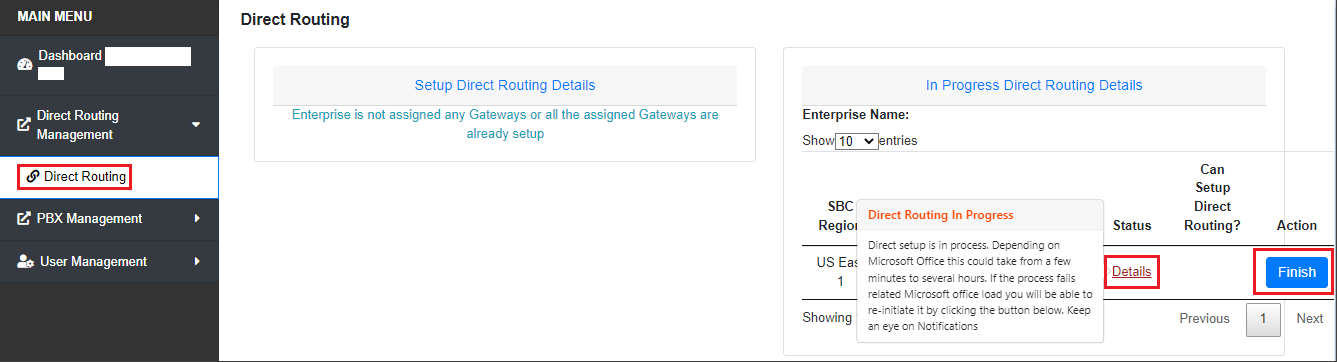
Direct Routing provisioning will take a few minutes; refresh the page after 2-3 minutes to check progress.
Direct Routing in Progress

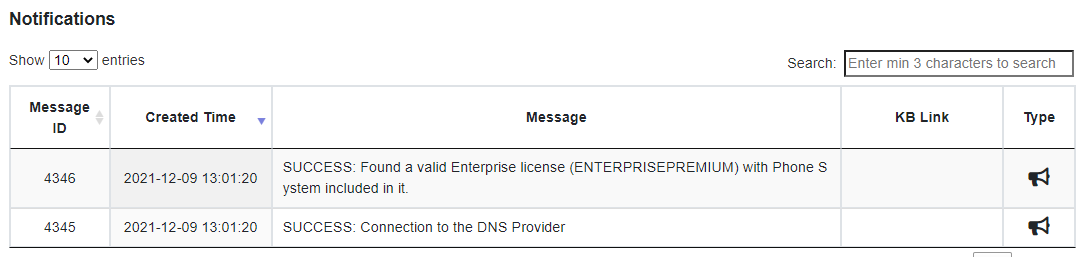
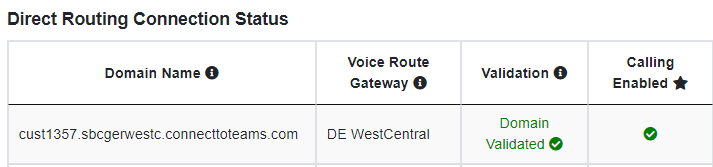
When the Direct Routing setup is complete, you will receive an alert email at the Enterprise email address instructing you to continue with PBX Settings, User Management, and Teams Management (Application set up). On the Enterprise portal dashboard, your Direct Routing Connection Status will display complete.
If the direct routing process completes and the "Calling Enabled" indicator is still showing as red, like the screenshot below,
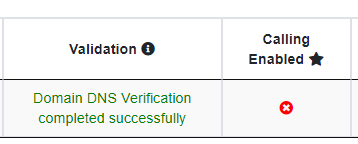
To initiate the direct routing process, click the "Finish" button on the right side of the Direct Routing page.
If that does not resolve the issue, please open a ticket with support.
Adding Additional Routes
If desired, it is possible to set up additional direct routes.
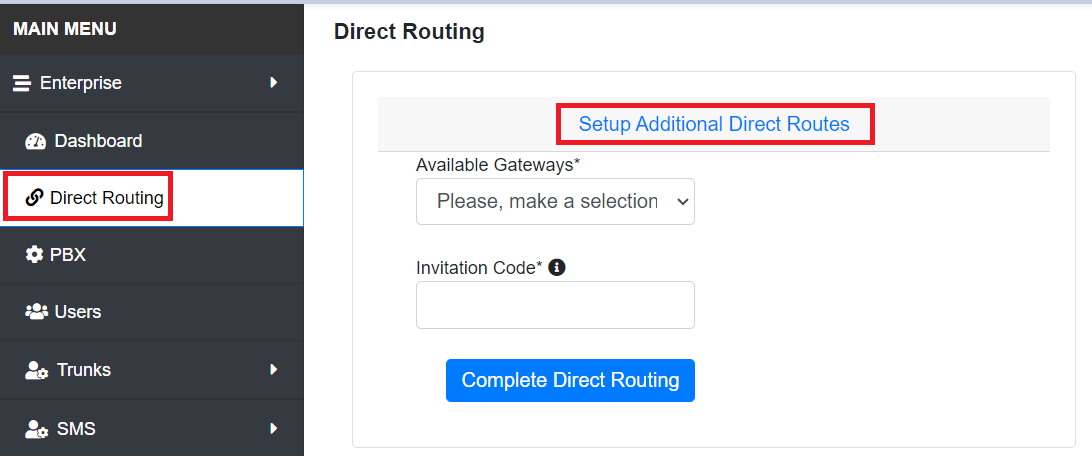
The form will be the same as the initial Direct Route. Use the same invitation code provided in the original email for all direct routes.
Each direct route creates a different Direct Routing User and consumes a Microsoft license, so remember to recover your licenses in the Microsoft Admin Center when you are done.
Step 4 - Add PBX
Configure PBX Settings
- Log in to the Microsoft Teams Phone Connector Portal
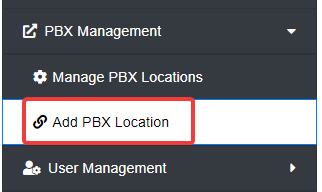
- Navigate to PBX Management > Add PBX Location
- Complete the following fields, leaving all others default:
- PBX Type: UnitedCloud.
- PBX Location: Enter a name for this. As this will be customer-facing, use your Company or Service Name.
- PBX DNS Lookup Type: Host.
- PBX SIP Domain: Enter the whole PBX domain of the client (it can only be alphanumeric) .
- PBX SIP Domain Proxy: Enter the PBX outbound proxy. Usually sip.siplogin.ca.
- Voicemail Feature Code: 5001 or *98.
- Click Save Settings
Configure Advanced Settings
- Select the ellipses menu next to the PBX you wish to configure and click Edit.

- Click Advanced Settings
- Complete the following fields:
(Information found by contacting UC Support) you will receive a shared 1password. The following image depicts the Advanced Settings screen beside the shared 1password file with color coding to indicate which values to paste into the API Integrations settings fields.


- Portal Authorization URL: https://api.iplogin.ca/ns-api/oauth2/token/?grant_type=password
- Client ID: Enter the Client ID for the PBX, which will start with Teams-
- Client Secret: Enter the Client Secret for the PBX
- API Access Username: Enter the login name for the Teams Connector PBX user, which will begin with 5599@
- API Access Password: Enter the password for the Teams Connector PBX user
- Autofill SSO settings from Endpoint and Access token credentials?: Yes
- Click Save Settings
- Once the PBX settings have been completed, you may advise the client to enable calling. Partners may also configure Single Sign-On and Manage Feature Codes, but these are optional and only used for the Teams End User Portal
Step 5 - Add Users
Add Users via the Teams Connector Provisioning Portal
- Log in to the Teams Connector Provisioning Portal using the tenant's Global Administrator O365 user.
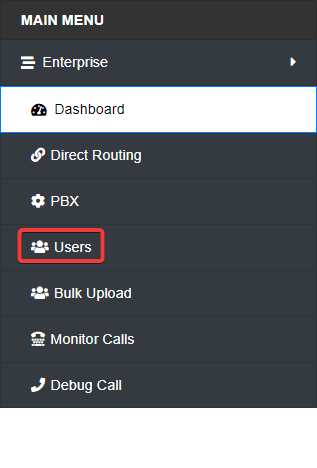
- In the main menu, navigate to Users.
- Select Set UP PBX User in the upper right-hand corner.

- For the user details, enter the following info:
- PBX Locations: Select the name of the configured PBX (typically PBX; usually only one option in the dropdown)
- Available Voice Routes: Either CA Central or US West, depending on the client's location
-
Teams User: the email address/ username associated with the user you're trying to add
- Note: this user needs to be assigned the correct licence, or they will not show in the dropdown
- SIP User: The user's portal extension (cannot already be assigned to another user)
- Phone Number: The phone number will auto-populate with the default Caller ID assigned to the PBX user in the Manager Portal. Change this to the user's extension number.
- Disable Voicemail in Teams: Check the box. Leaving this unchecked will prevent calls from reaching the user's PBX voicemail and can also cause issues with call queue routing.
- Assign Default DialPlan Policy: Check the box.
- After the device has been added to the Manager Portal, add the following information:
- SIP Authentication ID : <ext>tp (E.G. 101tp)
-
Password: Generate a random and secure 8-character, alphanumerical password using whatever password generator you prefer and paste it into this field.
NOTE: It is important not to include special characters in the password - Enter the Manager Portal Login Information for the user
- Click Save User
- Navigate back to the Dashboard from the Main Menu
- Under Teams Connector Admin Action Items, you may see an option to sync your Teams users. If this option is present, click Sync Teams Users. Otherwise, the user was synced automatically, and you may proceed to the next step.

- From the main menu, navigate back to Users, locate the user(s) you just added, click the three dots next to the user under the Action tab, and click Enable Calling if this option is available. If it says Disable Calling, this was enabled automatically, and you can skip this step.
Calling Features Available once the Connector is Operational
Once you have the Connector operational it is important to understand what is and is not possible as a Microsoft Teams user making and receiving calls.
With the Teams Application - an option you have - you can add more capabilities. See the suggested next step below.
Note that some features remain Teams Native due to Microsoft constraints.
| FEATURE | Available YES/NO | Comment |
| Calling Features | ||
| Teams: Outbound Calling | YES | |
| Teams: Inbound Calling | YES | |
| Teams: Extension Dialing Outbound | YES | |
| Teams: Extension Dialing Inbound | YES | |
| Teams: Feature Code Dialing (outbound only) | YES | |
| Teams: Hold/Resume | YES | Teams Native |
| Teams: Music On-Hold | YES | Teams Native |
| Teams: Transfer to PSTN | YES | |
| Teams: Transfer to Extension | YES | |
| Teams: Transfer to Teams | YES | |
| Teams: Warm Transfer to PSTN | YES | |
| Teams: Warm Transfer to Extension | YES | |
| Teams: Warm Transfer to Teams | YES | |
| Teams: Park | YES | Teams Native |
| Teams: Add a PSTN Caller | YES | Requires Teams Audioconferencing |
| Teams Meeting: Add a PSTN Caller |
YES | Requires Teams Audioconferencing |
| Teams: Add a Teams Caller | YES | Teams Native |
| Teams: Contact Management | YES | Teams Native, also triggerable in the Teams App |
| Teams: Call History | YES | Teams Native |
| Teams: Inbound Caller ID | YES | Passthrough from PBX |
| Teams: Outbound Caller ID | YES | PBX CallerID |
| Teams: Delegation | YES | Microsoft Shared line Appearance Docmentation |
| Teams Application (optional) | ||
| Voicemail Notification | YES | Requires PBX support SIP subscription |
| Voicemail Access | YES | Requires PBX support SIP subscription |
| Feature/Star Codes | YES | |
| Feature/Star Codes InCall | YES | |
| Configurable Softkeys | YES | |
| Existing End User Portal | YES | Existing Portal must support single sign-on (SSO) |
| Branding | YES | Logos, Names, Feature Codes |
| Teams Slash Commands (Quick Codes) | YES | |
| Callback | YES | Launchable from a call card |
| Schedule Meeting | YES | Teams Native software, launchable from a call card |
| Create New Contact | YES | Teams Native software, launchable from a call card |
Next Steps to Consider: