Remote Call Recording Storage
Table of Contents
Remote Call Recording Storage Remote Recording Options (Business Provided and Managed) Add Remote Storage Configuration Edit Remote Storage Configuration File Upload Process Playback Archived Recordings
Remote Call Recording Storage
Remote Call Recording Storage is an enhancement to the included call recording available within the Portal. The currently included storage is provided for the earlier of 30 days or ~300 hours of recordings (1 GB Limit setting) across the entire domain/business, which is plenty for most.
Remote Call Recording Storage comes in two variations: Self-Hosted (by the Partner or end-client) or Managed professionally by us with Amazon S3 redundant retention.
The first option is the business's Self-Hosted premise or cloud recording server/service, typically using an FTP transfer protocol or a self-managed, owned Amazon S3 bucket. We have no additional charges for this option. Total storage capacity is at the business decision-maker's discretion and at the business's own cost.
Secondarily, we can host this for you professionally on our Canadian Amazon S3 Storage instances, with replicated and secure S3 backups, with a small additional monthly investment by quotation of the partner team.
We will maintain the recording link from the Call History tab in the Portal to the remote stored file for at least three years. Planned future enhancements will further improve the simplified call recording link and search functions. They will be presented in the management portal for extended periods.
Storing voice recordings on a remote file storage system, whether it's an enterprise cloud-based storage solution, an enterprise on-premises storage solution, or a Managed Amazon S3 virtual server, can bring ease to businesses. It offers privacy, convenience, and extended accessibility, making it a valuable choice.
Additionally, storing recordings on a remote machine frees up storage space on the business's instance, increasing overall capacity. Call recording retention is also increased to 3 years for Managed Call Recording Storage, or longer if self-hosted on the enterprise's cloud or other remote-premises storage is selected. Longer call recording retention can benefit businesses in various ways, such as for compliance purposes, training and quality assurance, or for reference in case of disputes or legal issues.
The most significant benefit of utilizing Amazon S3 for voice recording storage is its added security. Amazon S3 offers advanced security features, including encryption and access controls, ensuring only authorized users can access the stored voice recordings. This level of security instills trust, especially for businesses that handle sensitive information or must comply with strict data privacy regulations, such as insurance, fintech, legal, government, and health-related businesses.
Remote Recording Options (Business Provided and Managed)
| AWS S3 Standard | Amazon's Standard class of its S3 remote storage option. |
| AWS S3 Glacier IR | Amazon's Glacier IR (instant retrieval) class of its S3 remote offering. Glacier provides a much cheaper per GB storage cost, but a higher retrieval cost. This is ideal for longer archive windows with where older recordings are not played often. Playback will still be available through portal with no noticeable delay. |
| Wasabi | An AWS S3 compatible offering with a minimum of 90 days retention, but often a lower price per GB/Month (Contact SysOps to activate this option if desired by UI Config) |
| FTP | File Transfer Protocol. Legacy unencrypted FTP. |
| FTPS | FTPS, also known as FTP-SSL, is a more secure form of FTP. FTPS is basic FTP with security added to commands and data transfer. |
| SFTP | SFTP, also known as SSH FTP, encrypts both commands and data while in transmission. This means all your data and credentials are encrypted as they pass through the Internet. |
Setup Instructions
1. Navigate to the Call History tab of the desired domain and select Recording Storage Settings.

2. Select “Add Remote Storage.” Choose a name for the storage, e.g. “Remote Storage AWS S3”
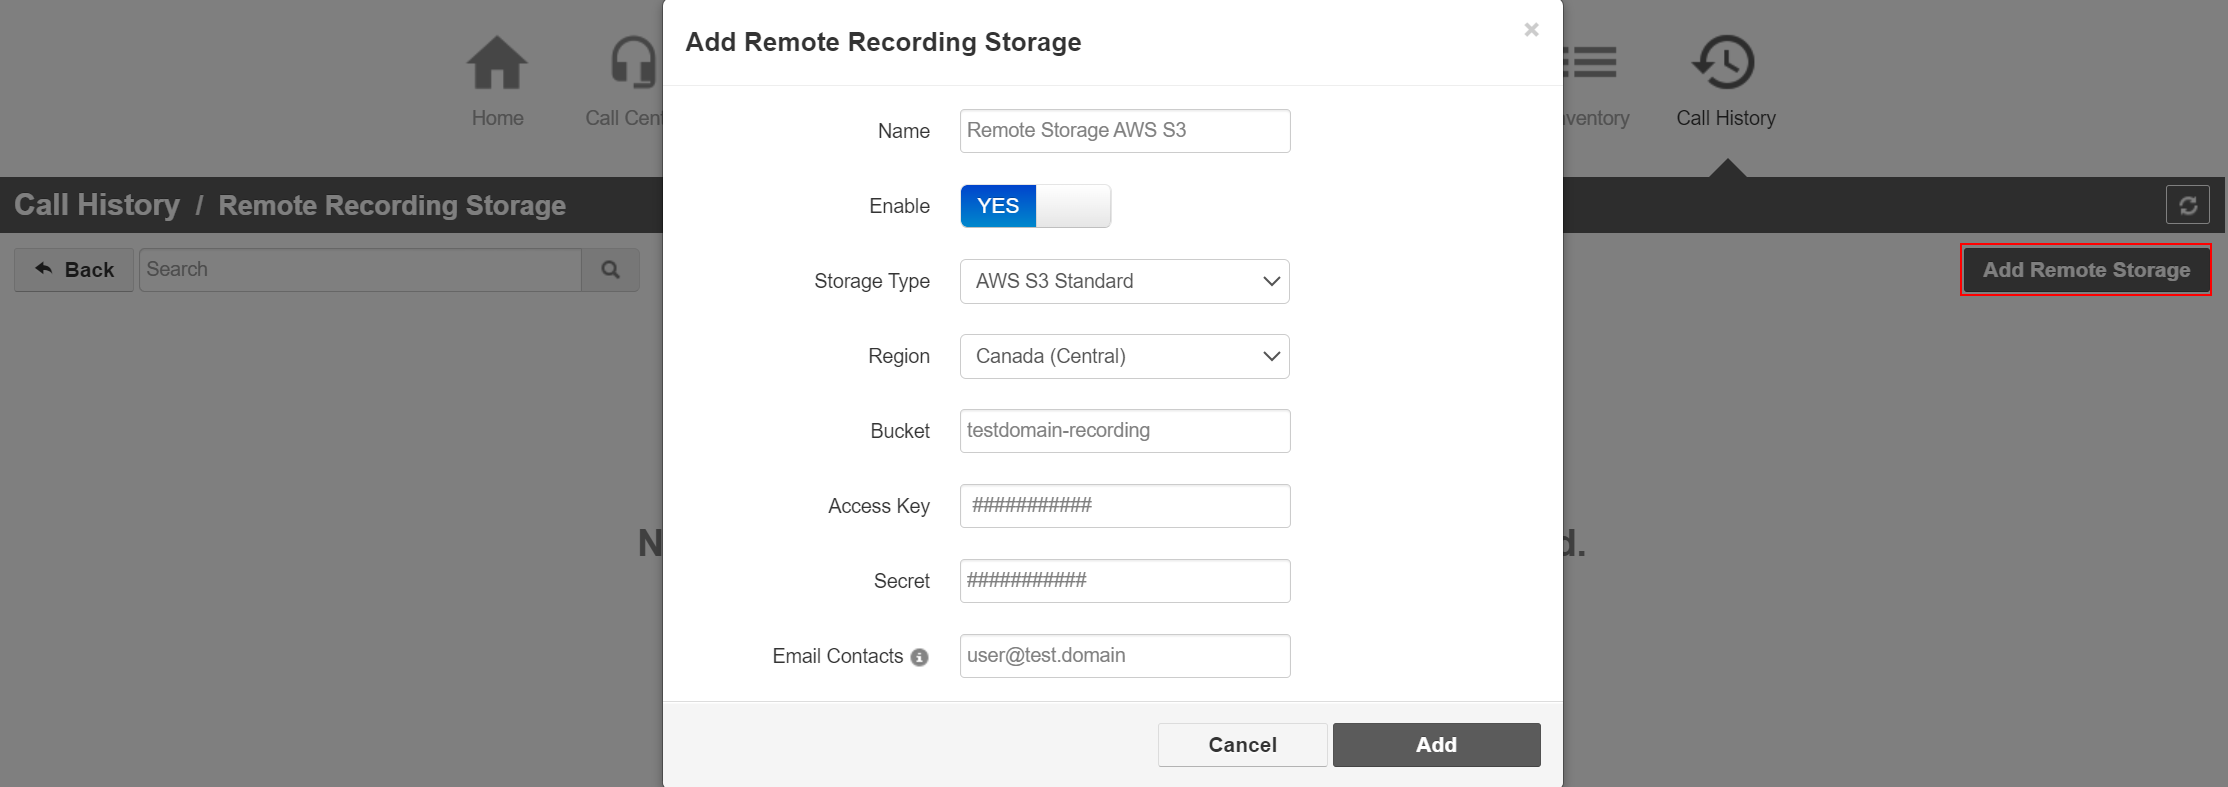
3. Input a name for the storage.
4. Toggle Enable to Yes.
5. Choose the desired Storage Type\Option (AWS S3 Standard, AWS S3 Glacier IR, FTP, SFTP)
6. Choose the desired Region. We suggest Canada (Central) for data sovereignty reasons.
7. Click Add.
8. The remote storage will show “enabled.” Call History > Remote Recording Storage displays the storage type, size, how much storage is used remotely, and the number of recordings stored.
Add Remote Storage Configuration
After setting the proper configs and parameters above, this section explains how to enable remote storage configuration for specific archive types.
1. Navigate to the Portal and the Call History screen. Click on the Recording Storage Settings button.
2. This opens a Remote Recording Session page, nested under the Call History page. These are all remote call recording configurations in your system. Note the green "active" tags below for configurations that are currently enabled, and the red "error" tag for a configuration that has configuration errors.

Important Notes - Read Me
1. Note that when adding a new configuration, the "Add" button will remain greyed out / unable to click until all of the necessary fields have been filled out (including the "enable" toggle).
2. Only 1 configuration at a time can be enabled per Archive Level and matching resource. You can have multiple configurations added, but only the "enabled" one will be used for new remote archive requests. The disabled ones will only be available for playback of previously archived recordings.
3. When multiple, conflicting, configurations have been added, archiving will catch on all calls for the "domain" archive level foremost, then it will archive based on the "reseller" level next, and finally at the "system" level.
4. An admin email account is required when adding a configuration. This is used if the remote requests stop functioning. After a few attempts (RemoteArchiveLogRetryCount above), then an email will be sent to the contact to assist with correction to make sure that the local server is not used unexpectedly for too long. To reset after a change, simply edit the configuration and save it preforming a new validation and the queue will resume in the new cycle if the errors are corrected.
5. Only users with the scope of a Super User can create or modify a "System" archive level. Resellers and above can create or modify "Domain" and "Reseller" level archiving.
3. Click to Add Remote Storage. Fill out the following fields and then click Add.
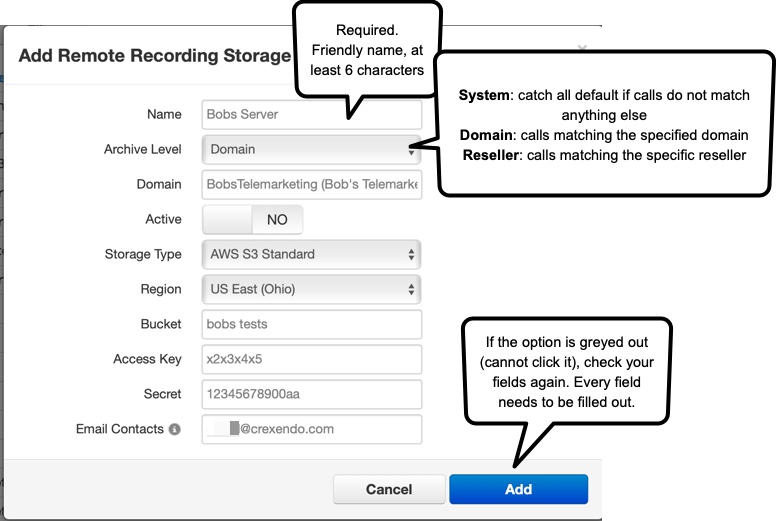
Archive Level indicates which calls are retrieved for remote storage. "System" is a catch-all for calls that do not match the specified Reseller or Domain name. If either "Domain" or "Reseller" is matched, no failover or additional copy will be sent to the other matching levels. For each recording, it will find the best-enabled match and attempt to use that and only that configuration.
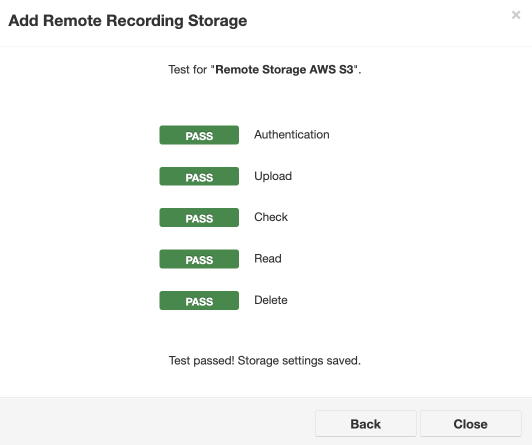
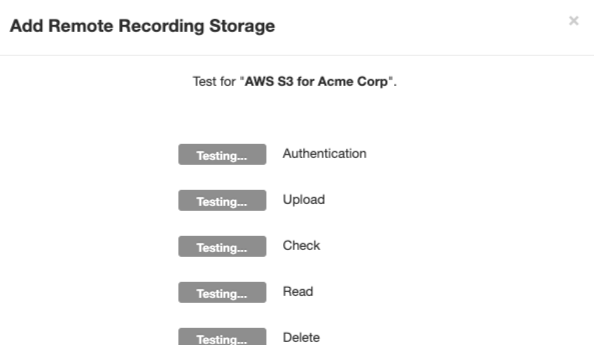
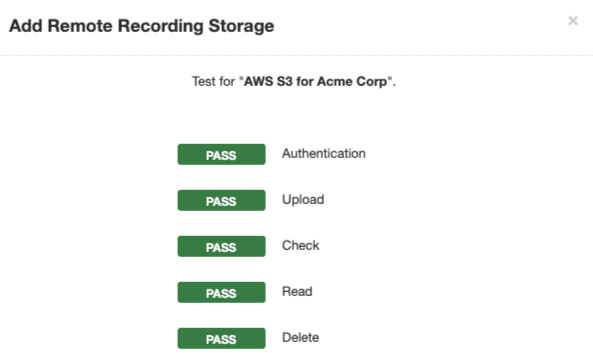
4. The Add button should be clickable after filling out the required fields in the modal. Now, the system will audit the addition of this configuration. Using the information provided, the Portal will work alongside the API to authenticate the remote side, upload a small .wav file, read it back, and then remove it to test all access requirements for this feature to perform correctly. This process should take between 2 and 15 seconds.
5. If successful, the prompt will look similar to this: "Test passed! Storage settings saved." Click to close the modal.
6. Now, the new configuration will be listed in the table on the Remote Recording Session page. Each row in this table displays its current configuration, storage size, and archive recording count. The count should start incrementing once the configuration is activated and it has calls to archive.

Edit Remote Storage Configuration
1. After remote storage has been configured, the table in the Remote Recording Session screen has editing options available to the right of every configuration.
Editing and deleting a configuration is only available when no archived recordings are linked to it. That configuration is needed to playback any recordings sent there; otherwise, they would be unlinked and unavailable to play.
There is also a "Test" button (microphone icon), which can be used to re-validate any settings using the same validation process as when adding a new configuration.

File Upload Process
When it's time to upload files to Remote Storage, all Recording modules for a given recording attempt to push their files to the chosen platform. If all files are identical, the Remote Storage platform will keep the first uploaded file. If the files vary in size, the system will favour the largest file. Redundant files will not be uploaded. All Recording Module databases will then be updated with the remote link.
Playback Archived Recordings
For playback in the Portal, use the same process as listening to any recorded call from the Call History page. If the file is remote, there will be a slight delay while the recording is fetched. This only happens after the "play" button is pressed, not when the Call History page loads. If "play" is activated, a local copy will be left on the Recording Server for several hours to prevent repeated requests for the same file.

Don't hesitate to contact your representative for a quote for our Managed Hosting Option.