Teams App for Voicemail Notifications
Prerequisites
- Ensure you have Custom Apps enabled at the organization level in Microsoft Teams Admin.
- Ensure the Microsoft Admin user who is launching the Application has a Microsoft Teams-capable license assigned. This is necessary in order to create the Team that is associated with the Application.
- Use Chrome browser when Synching the PBX app. Other browsers like Firefox fails to submit the request when the button on the popup is clicke
Step 1: Set Default Application Template Settings
At the Reseller level, select "App Templates" from the sidebar.
Instructions
On the Teams Application Management screen below you will select and input the following:
Version: Update any time you make a change to the app.
Dev Name: This will show the name of the publisher who created the app in the app store. Can be controller per Reseller.
Short Name: Used in the app store and as a header.
Full Name: Please populate with the same info as #3 above - Short Name.
Short Description: This is used in the app store to help users recognize that they have found the correct app when they do a search.
Full Description: This will appear as the body of the content on the “About” tab in the app.
Team Name: The name of the Microsoft Team for this organization. Each user of the connector within the organization will be a member of this Team. Note: This cannot be deleted once it is created.
If you are using Microsoft licenses intended for governmental use you will need to create the team manually in Teams first, then input the name of that team in this field.
Terms of Use URL: Enter the Reseller's terms of use URL link. By default, this will connect to ConnecttoTeams' terms of use. If you would like to copy that data into a page of your own and link to it on your own domain the direct link to ConnecttoTeams' policy is https://www.ConnecttoTeams.com/terms
Website URL: Enter the URL of the Reseller’s website.
Privacy URL: Same rules as the terms of use. The direct link to ConnecttoTeams' terms of use is: https://www.ConnecttoTeams.com/privacy
Application Branding Icons: These are icons that will be associated with the Application in Teams. The default will be either the ConnecttoTeams swirl or a graphic chosen by the reseller, but you can change this to anything you want (your logo, the Enterprise logo, a telephone graphic, etc.) following Microsoft graphical sizing parameters (192 by 192 pixels and 32 by 32 pixels in transparent .png format).
Note: For details about acceptable image formats and how the end result will be presented see Microsoft's documentation here.
Select Accent Color for Logo: If your logo has any transparent parts this is the color that will be shown in those areas. Use the Accent Color to select the color that you would like and press CHOOSE.
Configurable Tabs: The order in which the tabs in the application appear can be changed with this menu. Unselect and select the options in the Order you wish to see in the Teams Client. Tabs in red are mandatory per Microsoft; tabs in black are optional, so only add the ones the enterprise will be using. The best practice is to put the most-used tab first for a better UI experience. If you intend to use presence monitoring please ensure you enable the "PBX Softkeys" tab, as that is where that feature is activated.
Manage Event Notifications
Show Card on Inbound/Outbound Call?: This checkbox allows you to control the In-Call and Post-Call notification cards that appear when a call connects through the PBX and when a call ends in the Team Application.
Show Card for New Voicemail?: This checkbox allows you to control whether or not the user receives cards when they get a new voicemail. Some enterprises use other systems for voicemail (ie, emails with MP3 recordings attached) and find this notification redundant, so leave it unchecked if the customer does not need ConnecttoTeams to notify them about voicemails.
Show Utility card on Inbound/Outbound Call - select this if you want the user to have an option to Callback from Teams, Schedule a Meeting in Teams, or Add Contact in Teams as you can see in the graphic below.

Click "Save PBX Application Template."
Step 2: Customize the Application Template For The Enterprise.
Navigate to the dashboard of the intended enterprise. Select "Applications Management" from the sidebar.

The same settings that were configured at the Reseller level will have fed down to the enterprise level. Make any customizations necessary. Some resellers like to customize the app with their own branding. Some prefer to customize the app with the enterprise's own branding. This is where you can make individual changes, if desired, per enterprise. Make any adjustments necessary, then click "Save Application Template."
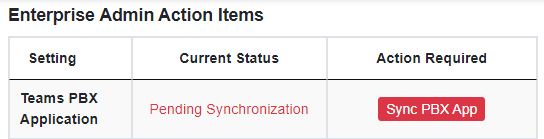
Step 3: Deploy to the Enterprise
The global administrator should log in to the Enterprise Portal and they will have a prompt in the "Enterprise Admin Action Items" on the dashboard prompting them to deploy the app. Click "Sync PBX App."
Note: Use Chrome browser when Synching the PBX app. Other browsers like Firefox fails to submit the request when the button on the popup is clicked
Then the Sync PBX Teams Application windows will pop up, and click Provision Application.

It will take a few minutes for the App to be built and to show under the Custom Teams Application. 
Check the notification section, you should get 3 notifications by the time it's done.

Step 4: Deploy to the End Users
Once the App is built, the user must locate the App in Teams by following the steps below:
Select More added Apps in Microsoft Teams.

Search for the Name of the App and click the three dots

Select Pin to keep the app on your Teams Account

This is what a completed app pinned on the Teams application will look like.

If the application fails to load correctly clear the cache and try again.
Troubleshooting the App
- If the Enterprise wants to redeploy the app or if there's an issue deploying the app:
- The Reseller will need to change the Team Name or the Application name (short name).
- The app will be slated for 'Sync' again.
- The Enterprise Admin will then perform another sync for the app to be deployed afresh.
- A Master Reseller can only set up the Template for a Reseller. The reseller must set up the configuration for the enterprise.
Related Articles
Teams Connector Add Users (Step 4)
Requirements Access to either the Teams Connector or Partner Provisioning Portal Add Users via the Teams Connector Provisioning Portal Log into the Teams Connector Provisioning Portal using the tenant's Global Administrator O365 user In the main ...Teams Connector Add PBX (Step 3)
Requirements Access to Microsoft Teams Phone Connector Portal Client ID & Secret (Partners should contact the Support department if they need this resent) Microsoft Teams Phone Connector PBX Credentials (White Label Partners should contact the Orders ...Voicemail IVR Tree
This article demonstrates the options available to you from the voicemail menu prompts. Prerequisites A configured voicemail box Tree Diagram See here for the voicemail tree, a downloadable PDF is attached at the bottom of the page.Record a Voicemail Greeting
Prerequisites Access to the Manager Portal Basic User or Higher user scope A registered phone. Log into the portal and click on the Messages icon. Select settings, this will open up your voicemail settings, Under the section "Greetings", click on the ...Teams Trunk Failover
Fail over Teams trunks will follow the DNS SRV record of sip.siplogin.ca and change registration when server maintenance has been initiated. If they do not return registration it can cause some issues as listed below Symptoms Teams trunks are not ...